How to Control Environmental Conditions for Calibration
Guide to stabilizing temperature, humidity and airflow for accurate calibration—tools, monitoring, ISO/IEC 17025 requirements, and common fixes.
To ensure accurate calibration, controlling temperature, humidity, and airflow is crucial. Fluctuations in these factors can lead to measurement errors, equipment damage, and increased costs. Here's what you need to know:
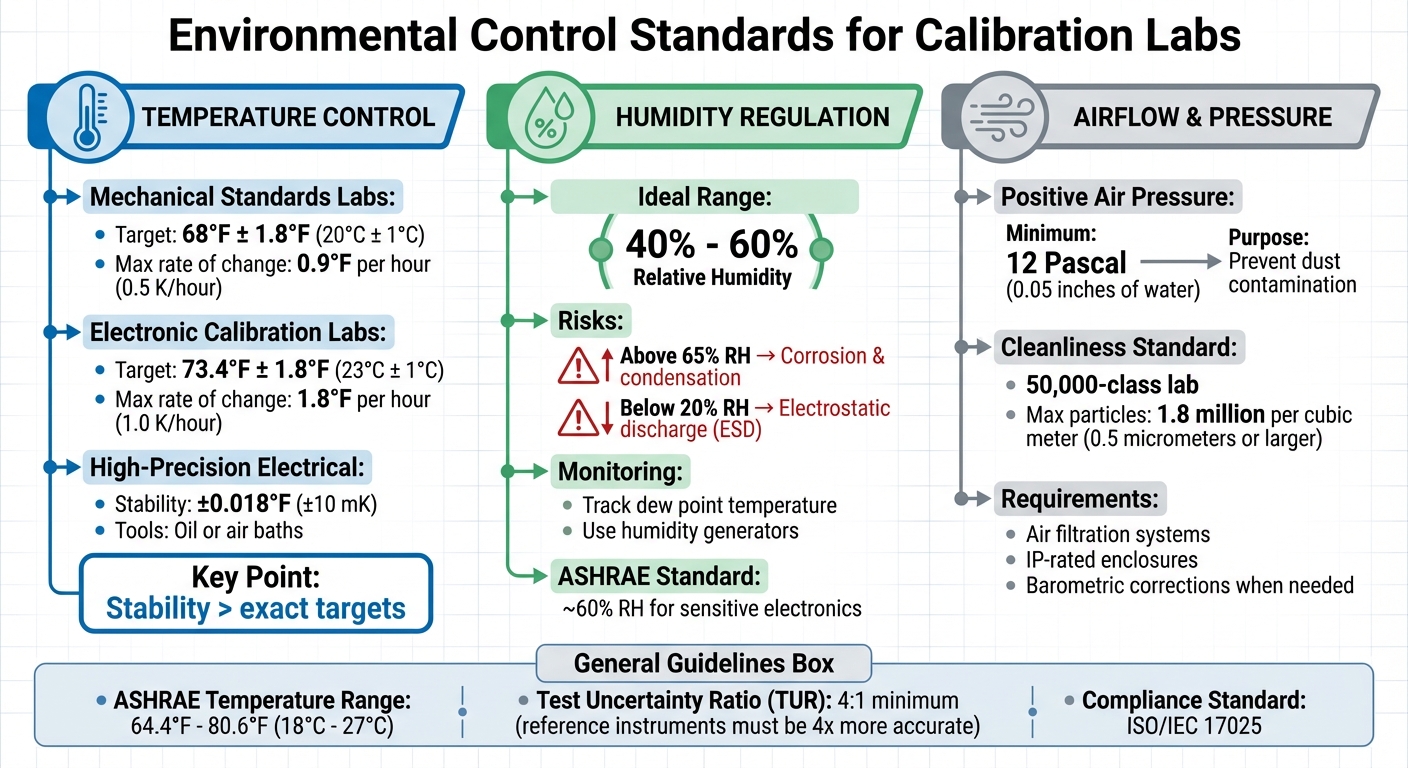
- Temperature: Maintain stability over hitting exact targets. Ideal ranges vary by lab type, such as 68°F ± 1.8°F for mechanical standards and 73.4°F ± 1.8°F for electronic calibration. Use tools like air baths or thermal compensation to minimize drift.
- Humidity: Keep relative humidity between 40%-60% to avoid condensation, corrosion, or electrostatic discharge (ESD). Humidity generators and dew point monitoring are effective solutions.
- Airflow: Prevent contamination and pressure inconsistencies by using air filtration systems and maintaining positive air pressure (12 Pascal or more).
Key tools include thermometers, hygrometers, data loggers, and environmental chambers. Continuous monitoring and proper documentation are essential for adhering to standards like ISO/IEC 17025. By stabilizing conditions, you can improve accuracy, reduce errors, and extend equipment lifespan.
How to Build a Calibration Lab: Roadmap to ISO 17025 Accreditation | Fluke Webinar
Key Environmental Factors to Monitor and Control
Environmental Control Standards for Calibration Labs: Temperature, Humidity & Airflow Requirements
When it comes to calibration accuracy, three environmental factors play a critical role: temperature, humidity, and airflow. These variables influence how instruments perform and how materials behave during measurements. By understanding their impact and interactions, you can establish stable conditions that ensure consistent calibration results. These factors lay the groundwork for the steps discussed in the following sections.
Temperature Control
Temperature changes can significantly affect both mechanical dimensions and electronic properties. For example, materials expand or contract as temperatures fluctuate, which can cause calibration settings to drift. Similarly, electronic components are prone to errors caused by even slight temperature shifts, and these errors can accumulate over time.
To achieve consistent calibration results, maintaining a stable temperature is more important than hitting a specific target. According to the National Research Council Canada, the recommended temperature ranges depend on the type of laboratory and its applications. For example:
- Mechanical standards labs: 68°F ± 1.8°F (20°C ± 1°C), with temperature changes no faster than 0.9°F per hour (0.5 K/hour).
- Electronic calibration labs: 73.4°F ± 1.8°F (23°C ± 1°C), with a maximum rate of change of 1.8°F per hour (1.0 K/hour).
For high-precision electrical work, tools like oil or air baths can help maintain stability within ±0.018°F (±10 mK). If perfect temperature control isn’t feasible, you can apply thermal compensation techniques to correct for residual effects. Additionally, instruments should be allowed to stabilize at the operating temperature before calibration begins - this thermal pre-conditioning minimizes drift and improves accuracy.
Humidity Regulation
Humidity levels can impact instruments in two major ways: excessive moisture can lead to condensation and corrosion, while low humidity increases the risk of electrostatic discharge (ESD). For example, relative humidity above 65% can corrode components, while levels below 20% are known to cause ESD issues.
"Humidity fluctuations can cause corrosion on circuit boards, degrade insulation, and lead to premature failure of sensitive components." – Tektronix
The ideal relative humidity range for calibration work is between 40% and 60%. To maintain this range, use humidity generators that mix dry and saturated air streams to achieve precise setpoints. Monitoring the dew point temperature alongside relative humidity helps to identify when condensation might form on sensitive surfaces. Before calibration, it’s essential to stabilize the environment, as outlined in the detailed process later in this guide.
Airflow and Pressure Management
Air pressure and airflow are equally important, especially for pressure-sensitive instruments like barometers, manometers, and altimeters. Variations in barometric pressure, caused by weather or altitude changes, can lead to inconsistent readings. Additionally, proper airflow management is crucial to prevent dust and contaminants from interfering with calibration.
To maintain a clean and controlled environment, laboratories should have a positive air-pressure differential of at least 12 Pascal (0.05 inches of water) compared to adjacent spaces. This positive pressure prevents dust-laden air from entering the calibration area. For example, a 50,000-class lab - defined as having no more than 1.8 million particles of 0.5 micrometers or larger per cubic meter - requires positive air pressure to meet cleanliness standards.
Air filtration systems and IP-rated enclosures can help reduce particle buildup. For specific calibrations, such as dew point measurements, manifolds can deliver a steady and uniform air stream to both the reference instrument and the device under test. If precise pressure control isn’t possible, barometric corrections can help account for variations during calibration.
With these environmental factors addressed, the next section outlines practical steps to maintain these conditions for accurate calibration.
Tools and Equipment for Environmental Control
Managing environmental stability during calibration is no small feat, but choosing the right tools can make all the difference. Accurate calibration depends on reliable equipment to measure, monitor, and control environmental conditions like temperature and humidity. These tools not only help mitigate issues such as temperature drift but also ensure your setup meets the precision needed for the instruments you're calibrating. Knowing the strengths and limitations of each tool is key to building a dependable calibration environment.
Thermometers and Hygrometers
Chilled mirror hygrometers are a standout for measuring moisture. They work by directly detecting the condensation temperature, which ensures minimal drift and excellent repeatability compared to conventional sensors relying on calculated variables. These instruments typically offer temperature measurement accuracy of ±0.18°F (±0.1°C), making them a top choice for reference standards in calibration labs.
For broader monitoring, distribute accurate thermometers and hygrometers throughout the calibration area. Reference instruments should meet a 4:1 TUR (Test Uncertainty Ratio), meaning they must be four times more accurate than the device being tested. For instance, calibrating a sensor with a 4% RH accuracy requires a reference instrument accurate to within 1% RH.
Data Loggers and Monitoring Systems
Automated monitoring systems are a game-changer for tracking environmental conditions. These systems can alert you to changes before they affect calibration results. Many modern systems even leverage IoT technology, allowing real-time remote monitoring and automatic adjustments for environmental shifts.
Humidity and dew-point generators double as control devices and monitoring systems. Portable options like the Fluke 5128A RHapid-Cal enable on-site testing of multiple sensors at once. For lab use, systems like the Michell ADG400 employ mass flow controllers to blend dry and saturated air with precision, automating calibration sequences. The Vapor Delivery System (VDS) offers a three-stage mass flow controller setup with PC software, making remote calibration and programming seamless.
If trace moisture calibration is your focus, pressure swing dryers are indispensable. These devices provide a steady supply of clean, dry air with dew points as low as -148°F (-100°C), ensuring precise moisture control.
Environmental Chambers
When you need a fully controlled space, environmental chambers are indispensable. These chambers create isolated environments, shielding calibration work from external fluctuations in temperature, humidity, and air pressure. High-performance models like the Rotronic HygroGen2 offer ranges from 23°F to 140°F (-5°C to 60°C) and 2% to 99% RH, covering the needs of most sensors.
Key features to consider include multi-sensor capacity for calibrating several probes at once, transparent doors for easy monitoring of LED displays, and specialized grommet doors to accommodate various probe sizes. Non-porous internal surfaces are also a plus, as they’re easier to clean and reduce contamination risks. For fieldwork, portable chambers mounted on carts let you calibrate sensors on-site, avoiding potential damage from transporting them to a central lab.
To address additional environmental factors, consider supporting tools like barometers for air pressure corrections, vibration isolation tables for stabilizing sensitive instruments, and Faraday cages to block electromagnetic interference during electronic calibration. These tools ensure that even the most carefully controlled temperature and humidity conditions remain uncompromised.
Step-by-Step Guide to Achieving Proper Calibration Conditions
Step 1: Preparing the Calibration Environment
Start by ensuring all instruments are thermally stabilized. This prevents errors caused by materials expanding or contracting due to temperature changes. Pre-conditioning is a critical step for achieving accurate results.
To protect your workspace from electromagnetic interference, consider using Faraday cages. For added stability, vibration isolation tables can help maintain precision. If you're calibrating for humidity, make sure to fill the humidity reservoirs and check that the measurement chamber is empty and free from condensation. In dusty environments, keep contaminants at bay by using IP-rated enclosures and adhering to a strict cleaning schedule.
Pay close attention to atmospheric conditions, especially air pressure, which can impact pressure-sensitive tools like barometers and manometers. Monitoring these variables is essential. The American Society of Heating, Refrigerating and Air-Conditioning Engineers (ASHRAE) suggests maintaining temperatures between 64.4°F and 80.6°F (18°C to 27°C) and keeping relative humidity around 60% for sensitive electronic environments.
Once the environment is properly set up, focus on continuous monitoring during the calibration process.
Step 2: Monitoring Conditions During Calibration
With your environment prepared, continuous monitoring becomes key to maintaining accuracy. Keep an eye on temperature, humidity, air pressure, vibration, electromagnetic interference, and light levels throughout the calibration process. IoT-enabled smart sensors that deliver real-time alerts can be a game-changer, helping you address potential issues before they impact results.
"Start with lower temperature and humidity points first, then slowly ramp them up at each step of the calibration process. This ramp-up helps prevent excess moisture buildup in the chamber." - Fluke Calibration
Allow time for the chamber and the device to stabilize fully before taking any measurements. This step is crucial to avoid inaccurate readings caused by transient conditions. During the process, apply thermal and barometric corrections to account for any remaining environmental effects. Always ensure your Test Uncertainty Ratio (TUR) is at least 4:1, meaning your calibration equipment should be four times more precise than the device being tested.
Step 3: Verifying and Documenting Results
Once stabilization and monitoring are complete, the next step is to verify and document your results. This ensures the calibration process has met the required standards. Proper documentation is essential for quality assurance. Record all environmental conditions and adjustments as per ISO/IEC 17025 standards, which mandate that calibration conditions be clearly documented in the final calibration certificate. Include details about any discrepancies between the reference calibrator and the device under test, as well as the adjustments made to align with manufacturer specifications.
"Maintain detailed records of all calibration activities, environmental conditions, and any issues encountered. This documentation will be invaluable in troubleshooting and improving your processes over time." - International Process Solutions
In harsh environments, conduct a post-calibration inspection to check for corrosion, moisture, or dust buildup in connectors and circuit boards. Even if a sensor cannot be adjusted, document whether it passed or failed to maintain a clear performance history. Use automated calibration software to download, evaluate, and store measurement data. This minimizes manual errors and streamlines quality control. Finally, if instruments are stored after calibration, verify or recalibrate them before their next use to ensure they remain within specification.
Common Challenges in Environmental Control and How to Fix Them
Creating a stable environment is crucial for accurate calibration. Let’s tackle some common challenges and practical ways to address them.
Managing Temperature Fluctuations
Temperature swings can wreak havoc on calibration accuracy. Drafts from HVAC systems, sunlight streaming in, or heat from nearby equipment often cause instability. Even moving an instrument from storage to the calibration bench without letting it stabilize can lead to errors.
Here’s how to manage these issues:
- Drafts and Airflow: Place your calibration station away from air vents, and use shields or enclosures to block air currents.
- Sunlight: Install light-blocking curtains or, better yet, use a windowless room.
- Heat from Equipment: Relocate heat-generating devices like servers or batteries, or add cooling systems to the area.
- Thermal Mass and Ambient Drift: Allow large instruments to stabilize for several hours before use. For critical work, consider temperature-controlled chambers or liquid baths.
| Cause of Fluctuation | Practical Solution |
|---|---|
| Drafts/Airflow | Use enclosures or position stations away from vents. |
| Solar Gain | Install curtains or use a windowless room. |
| Equipment Heat | Relocate devices or add cooling systems. |
| Thermal Mass/Ambient Drift | Allow stabilization time or use temperature-controlled setups. |
Now, let’s move on to another major factor: humidity.
Dealing with Humidity Drift
Humidity can be a silent disruptor. High humidity risks condensation on circuit boards, leading to corrosion and short circuits. On the flip side, low humidity increases the likelihood of electrostatic discharge (ESD), which can damage sensitive electronics. Experts recommend maintaining relative humidity levels around 60% for optimal calibration environments.
"Without proper and regular humidity calibration, data centers risk asset failure and data loss due to electrostatic discharge (ESD) or condensation." - Fluke Calibration
How do you keep humidity in check? Use humidifiers or dehumidifiers to maintain a stable range of 40% to 60% relative humidity. For precision work, invest in high-accuracy humidity sensors. Compressed air systems? Pressure swing dryers can remove moisture effectively, achieving dew points as low as -148°F (-100°C). Don’t forget to inspect connectors and circuit boards regularly for signs of moisture damage.
Next up: addressing contamination and air quality.
Reducing Contamination and Air Quality Issues
Dust and airborne particles are more than just a nuisance - they can wear down components and lead to calibration drift over time. Protecting your instruments is key.
Start with IP-rated enclosures to shield equipment from dust. Pair this with air filtration systems to reduce particulate levels in your workspace. A strict cleaning schedule also helps prevent dust buildup that could interfere with readings. For setups involving compressed air, ensure it’s properly dried - pressure swing dryers work well for this purpose. Lastly, train your team on proper handling techniques to avoid introducing contaminants like oils during calibration.
Conclusion: Achieving Reliable Calibration Through Environmental Control
Achieving reliable calibration hinges on maintaining a carefully controlled environment. Factors like temperature, humidity, vibration, air pressure, and electromagnetic interference can all disrupt measurement accuracy. For instance, ESD (electrostatic discharge) alone costs the industry hundreds of millions of dollars each year.
"Calibration is not just a technical necessity; it is a cornerstone of quality assurance that must be managed with precision and care." - International Process Solutions
These environmental challenges highlight the importance of the measures outlined earlier.
By maintaining strict environmental controls, facilities can avoid premature equipment failures, reduce calibration drift, and lower recalibration demands - ultimately saving on operational costs. A stable environment ensures not only reliable immediate measurements but also extends the lifespan of equipment. For facilities aiming to achieve ISO/IEC 17025 accreditation, properly documented environmental controls are a must to keep measurement uncertainty within acceptable limits during audits.
Key steps include using continuous monitoring systems like data loggers, employing environmental chambers for sensitive tasks, and maintaining conditions between 64.4°F and 80.6°F (18°C to 27°C) with a relative humidity of 40% to 60%. Additional practices, such as pre-conditioning equipment, applying thermal corrections, and shortening calibration intervals in challenging environments, further safeguard the accuracy and reliability of measurements.
FAQs
How long should equipment acclimate before calibration?
Equipment needs to adjust to a controlled environment - ideally between 59°F and 77°F (15°C to 25°C) - for several days to ensure it stabilizes properly. During this time, factors like temperature and humidity should remain consistent, as fluctuations can affect calibration accuracy. The specific acclimation period varies depending on the instrument and surrounding conditions but typically requires multiple days to achieve reliable results.
What’s the fastest way to spot temperature or humidity drift?
The fastest way to spot temperature or humidity changes is by relying on sensors for continuous, real-time monitoring. Regularly compare these sensor readings to trusted reference standards to catch any deviations. Keeping the environment stable - like minimizing drafts or controlling airflow - can also make it easier to notice shifts. Additionally, using thermal compensation techniques improves accuracy, making it simpler to detect any drift quickly.
Do I need an environmental chamber for high-accuracy work?
An environmental chamber is often the go-to solution for tasks that demand precise control over conditions like temperature and humidity. These chambers are essential for maintaining measurement accuracy and minimizing drift caused by environmental fluctuations. When strict calibration standards are a must, investing in such a chamber becomes a smart choice. However, for applications where precision isn't as critical, regular calibration and careful monitoring might be enough. That said, high-precision work thrives in the stability provided by a dedicated chamber.