F1 Pitstop Tools Explained: Gun, Jack, Release
How F1 wheel guns, front/rear jacks, and the release interlock sync to deliver sub-3s pit stops—and why timing beats raw power.
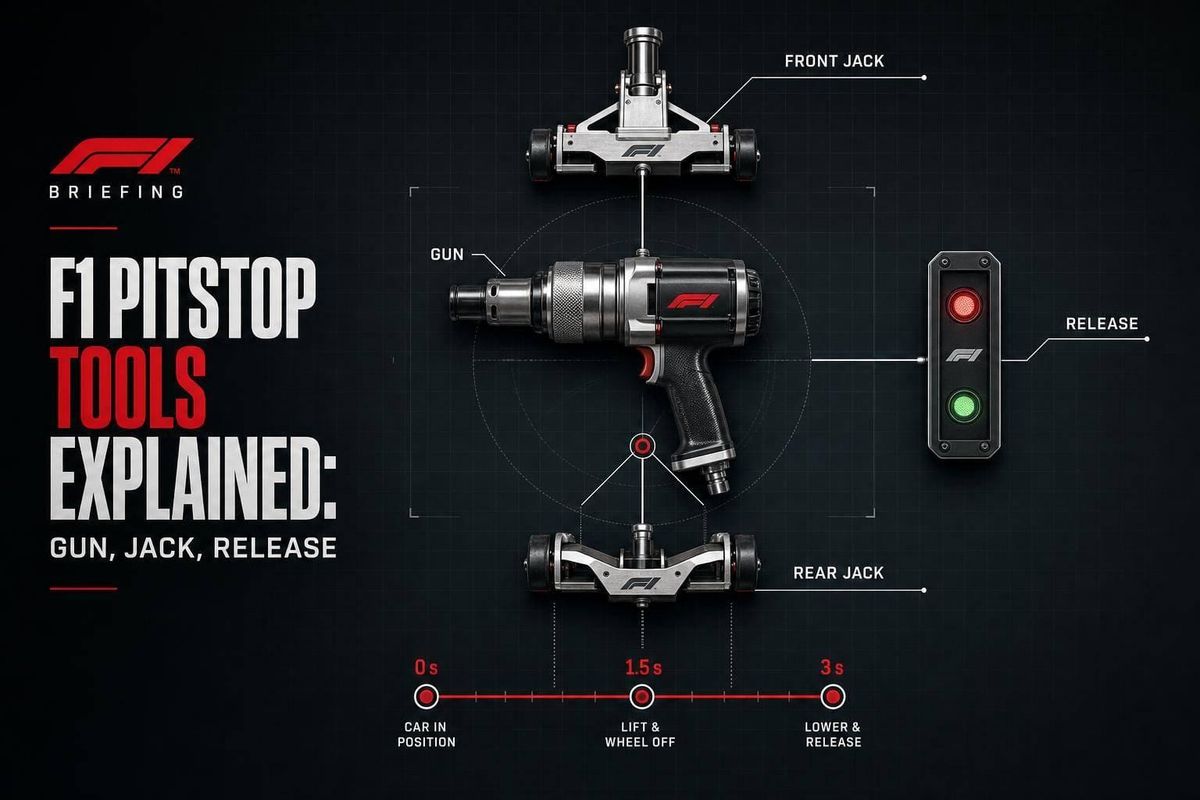
An F1 pit stop is one linked system: the wheel guns lock the wheels, the jacks lift and drop the car, and the release light stays red until every signal says the car is clear to go.
If you want the short answer, here it is: pit stop time is set by the slowest corner. A gun can deliver more than 3,000 Nm of torque, a car may be stationary for under 2 seconds in top stops, and one fault can stretch that to 52.4 seconds, as Sauber learned in Bahrain in March 2024.
Here’s the full article in simple terms:
- Wheel gun: removes and tightens the single center-lock wheel nut
- Front and rear jacks: lift the car about 1 to 2 inches (3 to 5 cm)
- Release system: waits for 4 wheel signals + 2 jack signals
- Main delay points: bad socket contact, wheel not fully seated on drive pins, late gunner confirmation
- Safety backstop: a crew member can still hold the car if there’s traffic or a loose part
- Big lesson: tool speed alone doesn’t decide the stop; timing between each step does
A clean stop comes from one smooth chain: lift, loosen, swap, tighten, drop, release. If one part is late, everything behind it waits.
The AMAZING Engineering of Pit Stop Tools! | How Impact Wrenches, Jacks, and Refueling Systems Work
sbb-itb-7c68254
What the wheel gun does and why its timing matters
An F1 wheel gun is a pneumatic impact wrench that puts out more than 3,000 Nm of torque to remove or secure the single center-lock nut on each wheel. In a pit stop, that force matters. But so does precision.
If the socket doesn’t hit the nut dead center, the team loses time right away. And in F1, that first miss can throw off the whole stop. Once the nut comes off, the job moves straight to the wheel swap and jack release.
A torque sensor can help here. It can trigger the green-light signal the moment the nut reaches the right torque. The gunner still has a signal button, but the sensor cuts some of the delay that can come from human reaction time.
How the gunner and tire carrier split the job
At each corner, the gunner and tire carrier have to work almost like one person. The wheel only comes off cleanly, and goes back on cleanly, when both of them hit the same rhythm.
| Phase | Gunner | Tire Carrier |
|---|---|---|
| Loosen | Aligns socket, triggers high-torque pulse | Braces to pull the wheel the instant the nut clears |
| Swap | Retracts, then repositions socket for new wheel | Removes old wheel, seats new wheel on hub pins |
| Tighten | Tightens nut to spec, hits signal button | Holds wheel flush until torque is set |
The tire carrier becomes especially important during installation. The new wheel has to sit fully on the hub’s drive pins before the gunner can tighten the nut. If that wheel isn’t seated all the way, the nut won’t sit right either, and the gunner is left waiting.
Where wheel-gun time is won or lost
Most lost time at the wheel gun comes from three things: poor engagement, drive pin misalignment, and delayed confirmation.
Poor engagement happens when the socket meets the nut at the wrong angle instead of square-on. That can round off the nut without turning it at all. The worst case is cross-threading, when the nut is forced onto the axle at an angle. That’s what happened to Valtteri Bottas at the 2024 Bahrain Grand Prix, when Sauber’s stop dragged out to 52.4 seconds because the cross-threaded nut needed manual intervention.
Drive pin misalignment is less dramatic, but it burns time all the same. If the incoming wheel isn’t fully on the pins, the gunner can fire the gun and nothing will seat. Then the crew has to reset the wheel while the car just sits there on the jacks.
The last place where tenths disappear is the confirmation signal. The gunner has to hit the signal button the instant full torque is reached - not early, and not half a beat late. Too early, and the car could be released with a loose wheel. Too late, and the car stays parked even though the hard part is already done.
That timing feeds straight into the jack and release sequence.
How the front and rear jacks lift, hold, and drop the car
The jacks create enough clearance for all four wheels to be changed at the same time. Because an F1 car sits so low, both ends need to come up together. The chassis rises about 1 to 2 inches (3 to 5 cm). That’s only enough for the tires to clear the ground and for the wheel guns to do their job.
Front jack versus rear jack: different roles in the same stop
The front jack lifts the nose, then swings out of the driver’s exit path. The rear jack lifts from the back and keeps the car steady while the wheel guns finish their work. It can’t drop early. It has to wait until the wheel guns signal clear.
Why jack release timing matters
The jacks stay up while the wheel guns seat each wheel and confirm it’s locked in. Dropping the car fast only helps if everything else is already done. If the jacks come down before the wheel work is finished, the stop falls apart. But if they stay up even a split second after the wheels are ready, that’s dead time the crew can’t get back.
Both jacks need to lower in step with the wheel confirmation signals. The car drops, the front jack swings clear, and the driver gets the green light in one smooth motion. If there’s any pause between the drop and the front jack clearing the exit path, you get a bottleneck at the exact moment the stop should be done.
Once the jacks come down, the release system decides if the car can go. Those jack signals feed into the release system, which gives the final green light.
How the release system decides when the car can leave
Once the wheel guns and jacks are done, the release interlock decides if the car can go. This isn’t just one button. It’s a safety system that waits for several signals to match before the driver gets the green light.
What signals feed the release decision
The release interlock waits for six signals: four from the wheel guns and two from the jacks. Each wheel gun has a sensor that detects when the wheel nut has hit the required torque. But that alone isn’t enough. The gunner also has to press a manual confirmation button on the gun itself. Only after both steps does that corner count as finished.
The two jacks send their own signals when the car’s weight settles back onto the ground. And there’s one more check: the front jack has to be fully out of the car’s path before the system accepts that input. That last lock is what turns finished pit work into a release.
The FIA also adds short delays. These stop crew members from pressing confirmation too early and give officials a moment to block a bad release. Once all six inputs are confirmed, the pit box light changes from red to green.
Why human oversight still matters
The system handles the checks, but people still matter when things get messy. Even if every signal turns green, a crew member - often called the release man - can still stop the car from leaving.
This person watches both the pit box and the pit lane for things sensors might miss, like:
- a hand still near the wheel well
- loose bodywork
- traffic coming down the fast lane
The release man usually has a physical override button. If they call for a hold, the pit box light stays red no matter what the automated system says. Sending a car into the path of another in the pit lane leads to an unsafe release penalty - usually a 5-second time penalty added to the driver’s race time.
That mix of built-in delays, interlocked logic, and a human watching the full scene is what helps the system stay dependable when every fraction of a second counts.
How the gun, jacks, and release system work together in one stop
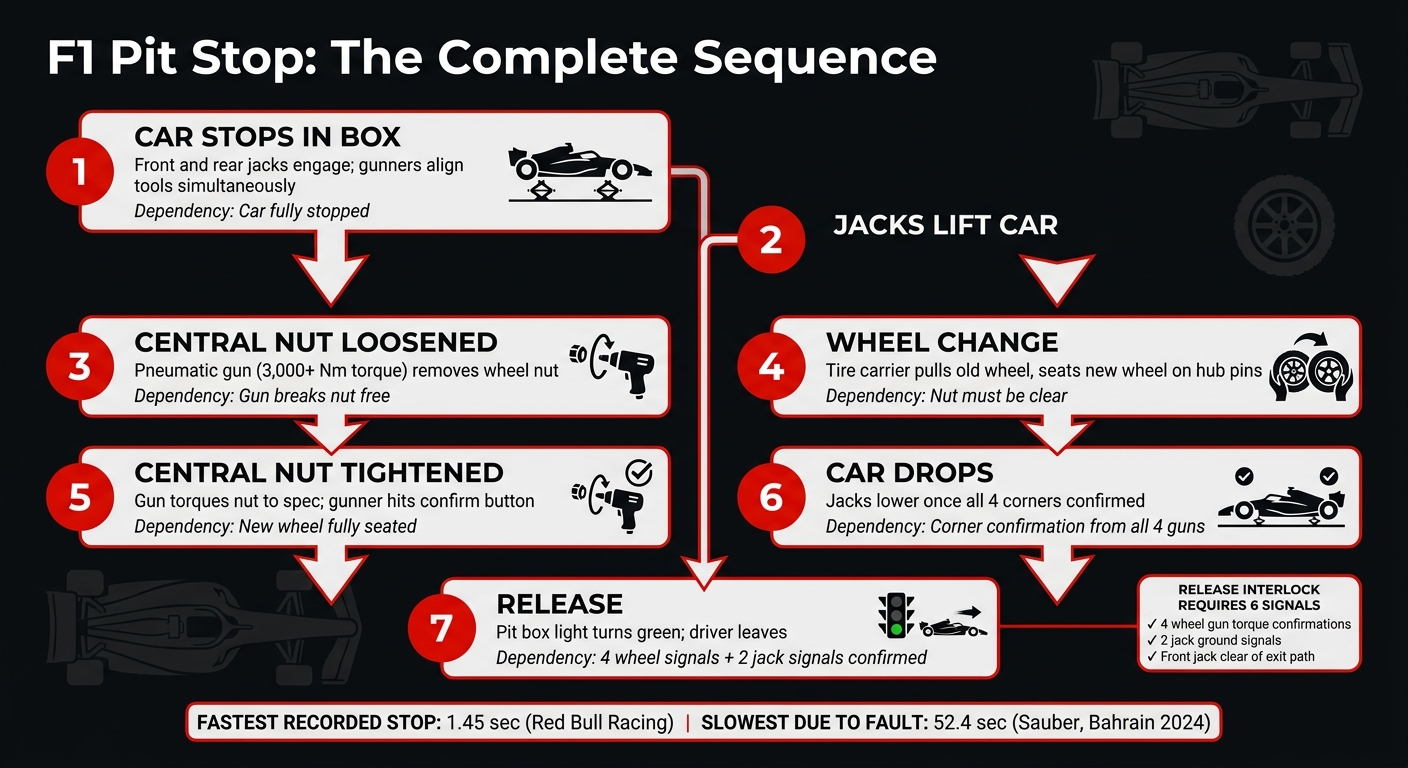
F1 Pit Stop Sequence: How the Gun, Jacks & Release System Work Together
A modern F1 pit stop works like one timed chain, not three separate tasks. The gun, the jacks, and the release system all have to line up from the first lift to the green light.
A step-by-step pit-stop timeline
The moment the car stops in the box, the front and rear jacks engage and the wheel gunners move in at the same time. After that, each action depends on the step right before it.
| Phase | What happens | What must come first |
|---|---|---|
| Car stops in box | Front and rear jacks engage; gunners align tools simultaneously | Car fully stopped |
| Jacks lift car | Chassis rises off the ground while gunners are already in position | Jacks make contact |
| Central nut loosened | The pneumatic gun removes the wheel nut | Gun breaks the nut free |
| Wheel change | The tire carrier pulls the old wheel away and seats the new one | Nut must be clear |
| Central nut tightened | The gun torques the nut; the gunner confirms the corner is done | New wheel is in place and the nut is tight |
| Car drops | The jacks lower the car once every corner is confirmed | Corner confirmation from all four guns |
| Release | The release light turns green and the driver can leave | Car is back on the ground |
Every corner has to clear before the release system lets the car go.
The most important link in that chain is the signal from the gun to the release system. Wheel torque and the gunner’s confirm button tell the system that the corner is finished. That extra check helps stop a car from leaving the box with a wheel that isn’t secure.
Why system performance beats peak tool speed
This is why the full sequence matters more than the top speed of any one tool. A pit stop is only as fast as its slowest part. One wheel gunner can be lightning-fast, but if another corner runs into trouble, the car still can’t be released until all four corners are done.
| Tool or action | What it speeds up | What it depends on | What can still delay the stop |
|---|---|---|---|
| Wheel gun | Nut removal and re-tightening | Correct alignment with the wheel nut | Poor alignment or a delayed confirmation signal |
| Jacks | Lift both ends of the car | Car stopping in the right position | Late engagement at either end |
| Release system | Sends the all-clear | Gun and jack signals from every corner | Any unconfirmed corner |
Fast stops come from clean alignment, steady lifting, correct torque signals, and tight coordination. Raw gun power on its own isn’t enough.
Key takeaways: What actually determines a fast F1 pit stop
Once you get past the mechanics, the main point is pretty simple: pit-stop speed comes from sequencing, not from one tool working faster than the others. A fast stop happens as one connected chain, not as three separate tool actions.
What matters is how fast each step passes cleanly to the next. That’s why a single failure has such a big effect. If one corner fails, the release stays blocked, and a stop can go from under 3 seconds to more than 50.
Red Bull Racing’s benchmark of 1.45 seconds didn’t come from faster standalone tools. It came from synchronized handoffs.
Peak tool speed sets the ceiling, not the result. The actual stop time depends on clean alignment, instant torque confirmation, and a safe release.
FAQs
Why do pit stops still fail with powerful wheel guns?
Even with powerful pneumatic wheel guns, pit stops can still go wrong. The reason is simple: success depends on perfect synchronization, not just raw tool speed.
A pit stop relies on jack operators and tire changers working in lockstep. So when timing slips even a little, things can unravel fast. A brief miscue, a communication gap, cross-threaded wheel nuts, an improperly secured tire, or another human mistake can turn a split-second delay into a costly problem that lasts several seconds.
What happens if one wheel is ready before the others?
If one wheel is done before the rest, the car still can't move. It has to wait until all four wheel changes are confirmed complete.
That’s why modern F1 teams rely on sensor-based traffic light systems at each wheel station. These systems check that every tire is fitted the right way and keep the car from being released until the pit lane is clear. In a 2.0- to 2.5-second stop, even a small holdup at one corner can throw off the whole sequence.
Can a team stop the car after the light turns green?
Yes. Once the automated traffic light turns green, the release goes live. But the team still owns the safe rollout.
If an immediate risk shows up, the team can step in by hand or override the system to stop the car and block an unsafe release. Doing that is strictly penalized.