F1 Traffic Assessment for Pit Stops: Guide
Judge F1 pit stops by effective rejoin gap: traffic, true pit loss, tire warm-up, DRS trains and release risk.
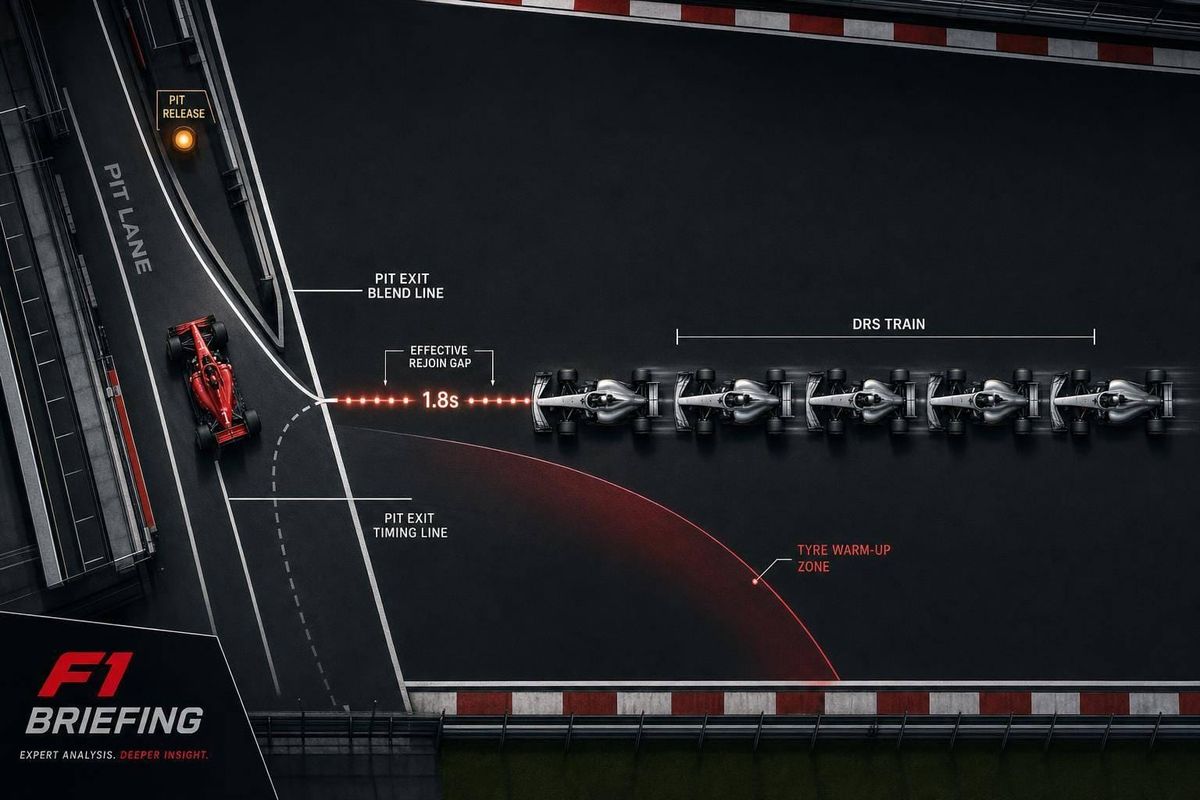
A pit stop works only if the car comes back into clear air. In F1, that means I can’t look at the gap alone. I need to check pit-loss time, tire warm-up, traffic packs, DRS trains, and pit-lane release risk before I call the stop.
Here’s the short version:
- Map the traffic: I look for rivals, backmarkers, slow cars, pit-lane cars, and DRS trains.
- Measure the true pit cost: Not just the listed lane loss, but also the in-lap, stop time, out-lap, and any delay.
- Test each stop lap: I compare pitting now, one lap later, or two laps later.
- Check the rejoin: A car that exits into traffic can lose the undercut even with new tires.
- Watch release risk: A short hold is often better than contact or a 5-second or 10-second penalty.
- Use live data: Radio gives context, but sector times and gap trends confirm the call.
A few numbers matter right away. An undercut often needs about 0.8 to 1.0 seconds per lap of tire pace gain, and it tends to be strongest when cars are within about 2.0 seconds, though that changes by track. In Singapore 2022, pit loss was about 28 seconds. In Monaco 2021, the target to pit and stay ahead was about 22 seconds.
The main point: I don’t judge a stop by the raw gap. I judge it by the effective rejoin gap:
Effective rejoin gap = predicted pit-exit gap − traffic delay − tire warm-up loss
If that number looks weak, the stop can fail even if the math first looks fine.
| What I check | What it tells me |
|---|---|
| Rival gap | Whether the undercut or overcut is open |
| Traffic on track | Whether the car will lose time right after the stop |
| DRS train | Whether overtaking will be hard even with tire pace |
| Pit-exit and release | Whether the stop stays clean or turns into a delay |
| Tire trend | Whether staying out one more lap still works |
So if I want a simple rule, it’s this: pit for clear air, not just for tire age.
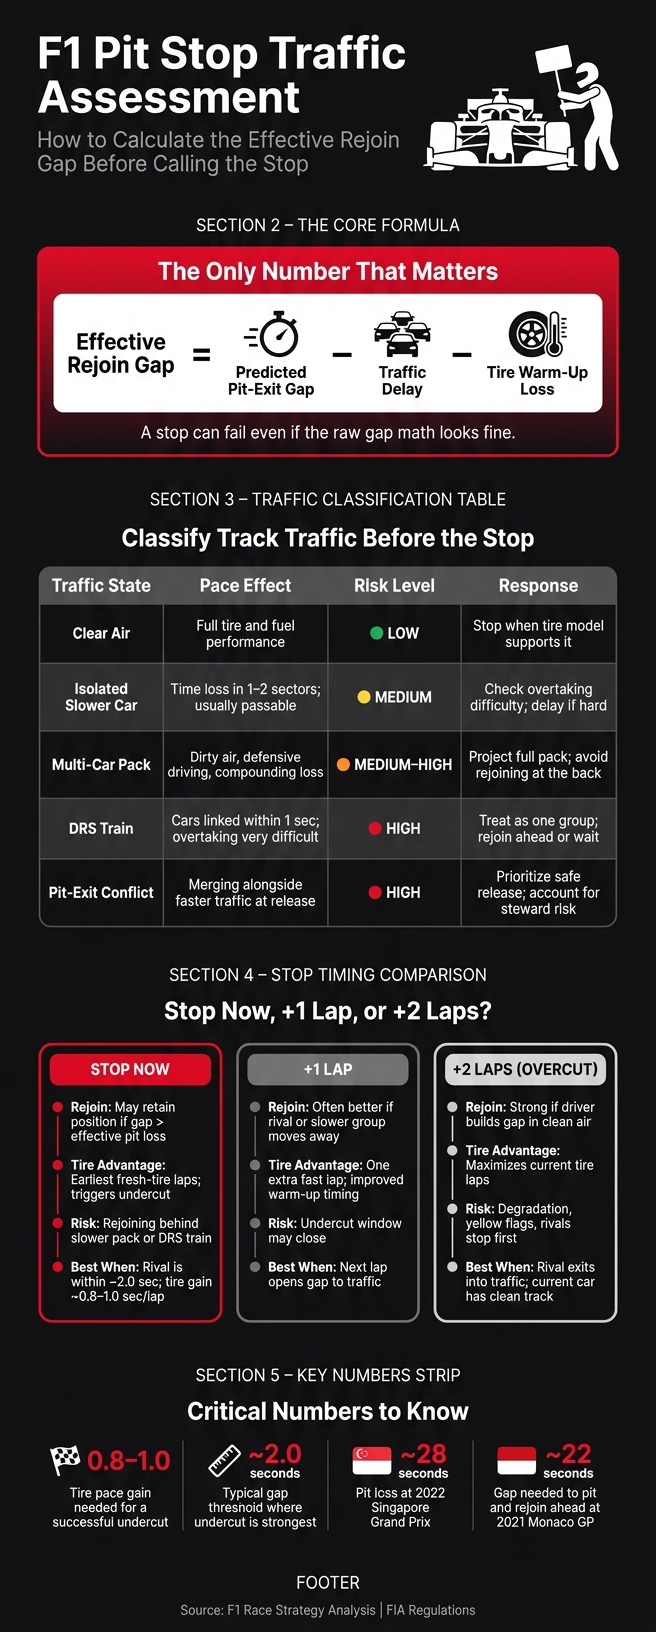
F1 Pit Stop Traffic Assessment: Effective Rejoin Gap Decision Framework
Every F1 Pit Strategy Explained in 6 Minutes
sbb-itb-7c68254
Read the Track Map and Classify Traffic
Treat the track map and live timing like a short-term forecast, not a frozen picture of the gaps. The job isn't just to see where cars are now. It's to project where each relevant car will be through the in-lap, pit exit, first out-lap, and the next two or three laps. That classification shapes the call: stop now, wait a lap, or stay out. From there, turn each traffic case into a pit-window and rejoin-gap estimate.
Which Cars on the Map Demand Attention
Not every car on the map deserves the same attention. A few groups matter most.
The direct rival comes first. Track its sector position, tire age, and any sign that it may be getting ready to pit. Cars approaching pit entry matter too. They may vanish into the lane before your driver gets there, or they may create doubt if they stop at the same time. Cars already in the pit lane can come out ahead and become instant traffic, so both their pit-stop time and early tire warm-up pace matter.
Then there are the backmarkers. They can cost several tenths, or more, across a few corners. FIA regulations also provide blue-flag warnings at pit exit for cars leaving the lane when faster traffic is approaching. Damaged or slow cars are another headache. Their pace can swing from sector to sector. A car may look fine on the straight, then crawl through a technical section. And DRS trains need their own label altogether.
Sector position often matters more than the raw timing gap because merge timing changes the traffic threat. A rival 2.5 seconds behind in the fastest final sector may reach the pit-exit merge sooner than a car only 1.5 seconds behind that's stuck in a slow part of the lap.
Clear Air vs. a Compromised Rejoin
Classify traffic by the time it is likely to cost, not just by the car number on the screen. That sounds simple, but it's easy to get wrong in the heat of a race. One slower car might be a small nuisance. A tightly packed train can wreck the whole point of the stop.
| Traffic state | Likely pace effect | Risk level | Preferred response |
|---|---|---|---|
| Clear air | Full use of tire and fuel performance without obstruction | Low | Stop when the tire model and pit window support it |
| Isolated slower car | May cost time in one or two sectors; usually passable | Medium | Check how quickly the car can be passed; delay the stop if overtaking looks difficult |
| Multi-car pack | Repeated dirty air, defensive driving, and compounding time loss | Medium to high | Project the full pack, not just the first car; avoid rejoining at the back unless the tire advantage is large |
| DRS train | Cars stay linked by small gaps; overtaking is difficult even with fresh tires - DRS is available only within 1 second at the detection point | High | Treat the entire train as one traffic group; aim to rejoin ahead of it or wait for it to spread |
| Pit-exit conflict | Risk of merging alongside faster traffic immediately after release | High | Prioritize a safe release; account for any time lost or steward risk |
A clean undercut can fall apart if the car rejoins into traffic before the tire edge turns into lap time.
That traffic call sets up the next step: working out how much pit-lane loss the gap can actually absorb.
Calculate the Pit Window and Rejoin Gap
Once you've sorted the traffic picture, the next step is to turn it into a lap-by-lap pit window. In plain English, the pit window is the stretch of laps where making a stop still makes sense.
Nominal Pit Loss vs. Effective Pit Loss
Nominal pit loss is the listed pit-lane time.
Effective pit loss is the number that matters in the race. It includes the full cost of the stop: the in-lap, pit-lane transit, stationary time, out-lap, traffic, and any release delay.
Effective pit loss = in-lap loss + pit-lane transit + stationary time + out-lap loss + traffic/release penalties.
At the 2022 Singapore Grand Prix, pit loss was about 28 seconds, which gave teams room to try either an undercut or an overcut.
Stop Now, One Lap Later, or Two Laps Later
Use effective pit loss to test each possible stop lap. This is where race strategy gets very practical: stop now, wait one lap, or stretch it two laps?
| Stop timing | Likely rejoin | Clear air | Tire-state advantage | Traffic exposure |
|---|---|---|---|---|
| Stop now | May retain position if the gap exceeds effective pit loss | High if pit exit is clear | Gains the earliest fresh-tire laps; may trigger an undercut | Risk of rejoining behind a slower pack or into a DRS train |
| One lap later | May lose the undercut window but uses one more lap of track position | Often better if a rival or slower group moves away | Preserves one additional fast lap and may improve tire warm-up timing | Depends on whether the next lap opens or closes the gap to traffic |
| Two laps later | Can gain through an overcut if the driver stays quick; risks sharp degradation | Potentially strong if the driver builds a gap in clear air | Maximizes time on current tires but reduces laps available for the fresh set | Greater exposure to tire drop-off, yellow flags, and rivals stopping first |
| Safety Car or VSC | Often preserves or improves position because effective pit loss is reduced | Usually favorable, but pit-exit traffic still applies | Fresh tires at a discounted race-time cost | High risk of a queue at pit exit if several cars stop together |
An undercut tends to work best when fresh tires are worth about 0.8–1.0 seconds per lap and the car is within about two seconds of the rival. An overcut can work when the driver keeps good pace in clean air while the rival gives away time on tire warm-up or in traffic.
Why the Gap to a Rival Is Not Enough on Its Own
A simple gap to the car ahead doesn't tell the whole story. Pit exit position only helps if the car can hold that position.
Say Car A is 2.0 seconds behind Car B and has a 1.0-second-per-lap tire edge. Car A pits and comes out 1.0 second ahead after Car B stops on the next lap. On paper, that looks like a win. But if Car A rejoins behind three cars that are each 0.8 seconds per lap slower, the lost time over the next few laps can wipe out the gain against Car B.
That's why the effective rejoin gap matters more than the raw gap:
Effective rejoin gap = predicted gap at pit exit − traffic delay − warm-up deficit
So the call to pit should be based on two things: where the car will rejoin, and what pace it can run after that. Not the gap alone. Formula 1's official analysis of the 2021 Monaco Grand Prix estimated that a frontrunner needed about 22 seconds to pit and rejoin ahead, and even then slow warm-up on the harder tire compound kept the overcut in play.
Pick the Right Stop Type and Manage Release Risk
Once you know the effective rejoin gap, the next step is simple in theory and tricky in practice: pick the stop that keeps track position. In most cases, that means choosing between an undercut, an overcut, or a short delay.
When to Undercut, Overcut, or Delay
Go for the undercut when the rival is close enough to react and the pit exit is clear. Choose the overcut when the rival is likely to rejoin in traffic and your car can still produce solid pace on older tires. Delay the stop only if one extra lap helps the rejoin more than it hurts tire life.
| Strategy | Best traffic condition | Core requirement | Main risk |
|---|---|---|---|
| Undercut | Clear or manageable out-lap | Fresh-tire gain must exceed pit loss and any rejoin traffic | Rejoining behind a slower car or a DRS train |
| Overcut | Rival exits into traffic; current car has clean track | Competitive in-lap pace on older tires | Rival's new tires overcome the traffic disadvantage |
| Delay | Immediate rejoin is blocked or congested | Current tires survive one more lap without excessive drop-off | Traffic window closes, or rival covers the move first |
That choice only pays off if the car leaves the box into a safe gap. Get the strategy call right but botch the release, and the whole thing can fall apart in a second.
Release Delay vs. Unsafe-Release Risk
A strong strategy can still fail at the release. This is the last moment when the team still has direct control over the outcome, and two risks tend to get mixed up.
A release delay is a planned hold because the fast lane, a nearby pit box, or the pit exit is blocked for a moment. It costs time, but it is not a rules breach. An unsafe release is different. It means sending the car out in a way that could put pit-lane personnel at risk, damage another car, or send the car out in an unsafe condition. Under FIA 2026 guidance, an unsafe release can bring a 5-second or 10-second penalty, or a drive-through, depending on the case.
So if the release margin is even a little murky, the smarter move is usually to hold the car for a beat.
The team should check four things before release:
- the fast lane next to the box
- neighboring pit boxes and their release signals
- the pit exit and merge line
- the first sector, where the rejoining car may hit traffic
If any of those points is unclear, hold the car. A short delay hurts less than contact, a penalty, or dropping behind a rival and getting stuck there.
| Release scenario | Action | Strategic consequence |
|---|---|---|
| Clear | Release immediately once the car is safe and fully serviced | Preserves the planned pit-loss estimate |
| Marginal | Hold briefly, confirm the gap, then release when separation is clear | Adds a small delay but avoids collision and penalty exposure |
| Blocked | Keep the car stationary until the lane and exit path are clear | Turns into a longer effective pit loss; reassess whether the original strategy still works |
| Rival transit | Wait until the passing car has fully cleared the release path | A safe delay is preferable to an unsafe-release investigation or contact |
Any hold changes the pit-loss math right away. Once the car is delayed, update the gap at once because the first pit-loss estimate no longer applies.
Make the Final Call and Reassess After the Stop
Once the traffic map and pit-window math are set, the last call comes down to live timing. And that call isn't locked in until the car reaches pit entry. Traffic can shift. Tire condition can drop off. A rival can dive in first and flip the picture in a lap.
Use Radio and Timing Data Together
Use radio for context. Use timing data for proof.
That means you don't react just because the driver says the tires are gone. You act when those comments line up with steady sector-time loss, rising tire temperatures, worse degradation, or a shrinking gap behind. One bad lap might just be traffic. A pattern of bad laps usually points to the tires.
In the final sector, confirm three things: the pit loss, the release condition, and whether the target rival has already stopped. Then make the trigger dead simple: name the target car, the expected rejoin spot, and the delay condition. From there, turn that into a final-sector checklist the team can run through fast.
Real-Time Pit-Stop Checklist
Check these points before making the call:
- Target rival: position, tire age, compound, current pace, and likely pit lap
- Current gap: gap to the target, gap to the car behind, and gap to the likely rejoin traffic
- Effective pit loss: updated for release delay, tire warm-up loss, and traffic penalty
- Pit-exit traffic: cars at the merge point, in the first two sectors, or forming a DRS train
- Tire state: degradation trend, temperature, locking or traction issues, and how many competitive laps remain
- Release conditions: pit lane clear, equipment signals complete, car safe to release, and no unsafe-release risk
- Immediate vs. delayed outcome: projected position and pace if the car stops now versus one or two laps later
- Final trigger: the exact condition that cancels or confirms the call
Fresh tires matter only if the car comes back out in clear air. If it rejoins into a DRS train, a big chunk of that gain can disappear before the tires even get up to temperature.
FAQs
How do teams predict clear air before a pit stop?
Teams use real-time GPS timing data and strategy software that runs constant simulations. They watch live gaps and traffic to spot a pit window where the driver can rejoin without getting trapped behind slower cars.
By pairing telemetry with predictive models, teams can estimate the best lap to pit. The goal is simple: weigh the possible upside of an undercut or overcut against the downside of rejoining in traffic.
When does a DRS train kill an undercut?
A DRS train can kill an undercut.
Here’s why: if a driver rejoins behind a line of cars all using DRS to defend, passing gets hard fast. Even with fresh tires, that extra straight-line speed takes away much of the usual tire edge.
So the undercut loses its punch. The pace gain from pitting early gets canceled out, and the time stuck in traffic ends up costing more than the stop helped.
Why can a one-second release hold be worth it?
A one-second release hold can be worth it if it prevents an unsafe release. That brief pause can open up a safer gap in pit-lane traffic and lower the chance of contact, penalties, or an investigation.
In Formula 1, every fraction matters. But a clean, safe exit is often the better trade-off than losing far more time to damage, penalties, or even retirement.